ZeroC Ice is a distributed computing platform supporting many languages including Java. Building an Ice project requires compiling “slice” data structure definitions into a compatible Java interface. Most often it is recommended to use the Eclipse plugin, however I prefer to use IntelliJ and a build tool which is IDE agnostic. Official Gradle support is coming in Ice 3.6, but that’s still in beta. Fortunately it’s quite easy to invoke te slice2java tool from Gradle and develop Ice 3.5 projects on Gradle and IntelliJ by extension.
Project structure
You should set up your project using the standard Gradle structure:
1 2 3 | |
Put your Java sources in the java folder and your slice files in the slice folder.
build.gradle
Populate your build.gradle using this base:
1 2 3 4 5 6 7 8 9 10 11 12 13 14 15 16 17 18 19 20 21 22 23 24 25 26 27 28 29 30 31 32 33 34 35 36 37 38 39 40 41 42 43 44 | |
Replace MySliceFile.ice with the name of your slice file.
Building the project
You should now be able to run gradle compileSlice which will generate a new folder called slice/main/java,
compile the slice file and output the result to that new folder.
compileSlice is also a dependency of compileJava so you only have to run gradle build which will compile the
slice files then your Java source including the generated Java from the slice compiler in one go.
It is assumed that slice2java is in your path, if the build fails with a message such as
A problem occurred starting process 'command 'slice2java'' check that it’s in your path by running which slice2java.
Optional: Building distributable packages
You can alsop use the Gradle application plugin
to generate distributable packages of your Ice application, including a bundled copy of ice-3.5.0.jar.
Update your build.gradle:
1 2 3 4 5 6 7 8 9 10 11 12 13 14 15 16 17 18 19 20 21 22 23 24 25 26 27 28 29 30 31 32 33 34 35 36 37 | |
Substitute your own class names as applicable in the code above.
Build your distributable by running gradle distZip, you should find the output under build/distributions/MyProject.zip.
Using IntelliJ
You should now be able to import your Gradle project into IntelliJ like any other Gradle project: File > New >
Project from Existing Sources... > browse to and select build.gradle.
Create a new gradle run configuration for the gradle build task:

Also add a run configuration to run your application:
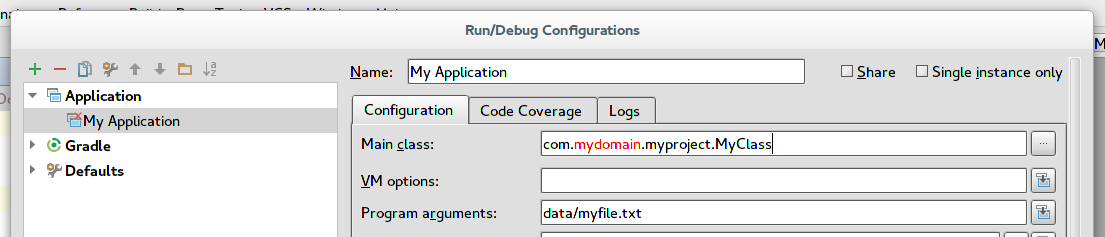
You should now be able to both build and run your application directly from IntelliJ.
Caveat on OSX
It’s a well
documented
issue that IntelliJ does not inherit
the path variable of the user on OSX. This means that when
you run gradle build from IntelliJ it won’t be able to find slice2java and you’ll get an error like
A problem occurred starting process 'command 'slice2java''. The easiest solution is just to use an absolute path
in commandLine 'slice2java' such as commandLine '/usr/bin/slice2java', alternatively you can explore some of the
solutions mentioned in the links above.